Video photometry and astrometry with GoQat
GoQat can record live video from a variety of devices. In particular, low-light video cameras such as Mintron or Watec can be used for asteroid occultation measurements or astrometry of fast-moving near earth objects, via an appropriate frame grabber. If you have a GPS-based video time inserter, the video signal can be overlayed with time-stamps accurate to a millisecond or better. In this case, it is possible to obtain accurate scientific measurements of transient events. GoQat enables you to play back the video, either a frame at a time, or for a defined range of frames, and perform measurements of the brightness and position of selected objects using Emmanuel Bertin's SExtractor code. The following sections show you how to use GoQat for video analysis.
Getting started
Start by loading a .SER format video file into the Playback window. If you don't want to analyse the entire area of the video frame, choose a subset by dragging a rectangle over the desired area. Then click the 'Photometry...' button.
The Photometry dialog box has the following parameters:
- Aperture diameter: The diameter of the aperture (in pixels) to use for the photometry measurement. You may enter non-integer values.
- Minimum area: The minimum contiguous area in pixels that an object must occupy before it is detected. Appropriate use of this value may make it possible to reject hot pixels, for example.
- Threshold: The number of standard-deviations above the background level that a pixel value must lie before it is detected.
- Max. shift: The maximum shift in the centroid of an object that is permissible from one frame to the next.
Note that it isn't necessary to specify an area round each target object for the sky estimation: this is calculated automatically from an analysis of the background values across the selected area.
Making measurements
To make a measurement on the currently displayed frame, click the 'Measure single image' button. Circular apertures of the chosen diameter are drawn round the detected objects, and the results are summarised in the panel at the bottom of the dialog box. Here's an example:

The displayed results are:
- The x- and y-coordinates of the detected object.
- The number of sky-subtracted counts in the aperture for that object.
- The signal-to-noise ratio for that object.
- The sky background for that object.
- A flags value for the object. Try to set the detection parameters or selected area appropriately so that the flags value is zero. Non-zero values are warnings of varying severity (see the SExtractor documentation) that indicate potential problems with the measurement.
You can experiment with the aperture diameter to see how the signal-to-noise ratio varies, and to obtain an optimal diameter that includes the majority of the object's flux.
Before measuring a range of frames, you must first perform a measurement on a single frame from within that range. Usually this will be the first frame of the range. This initial single-frame measurement defines which objects will be detected in all subsequent frames. When you are satisfied with the parameters for the single-frame measurement, enter the first and last frame numbers of the range in the 'Mark first' and 'Mark last' fields and click the 'Measure selected range' button. It can appear as though nothing has happened when measuring a range of frames, but GoQat will have written the results files.
If an object disappears in one or more frames (e.g. a star is occulted by an asteroid), the last frame containing the star is used as a template for the star's position. Photometry is made at that position until the star re-appears. Moving objects are tracked (provided that the motion does not exceed the given limit in the 'Max. shift' field). Consequently, if a moving object is detected as object number 2 in the detection list (for example), it will still be reported as object number 2 even if it has moved across the frame.
You may want to set the time-stamps for each frame according to the GPS overlay beforehand (if you have used a video time inserter). The GoQat manual tells you how to do this for the range of frames that you select. The time-stamps are written to the photometry and astrometry data files, but for accurate scientific work you still need to be careful how to interpret them, depending on the type of video inserter you use and any integration settings for your chosen video camera.
Photometry and astrometry results
GoQat presents the results of the measurements in two separate files, one for the photometry data and one for the astrometry data. A record from the photometry file has this structure:
Frame_number time_stamp flux_1 flux_error_1 ..... flux_n flux_error_n mean_sky
Flux_n and flux_error_n are the flux measurement and the error in the flux measurement for object 'n'. The 'mean_sky' value is the mean of all the sky background estimates for each detected object.
A record from the astrometry file looks like this:
Frame_number time_stamp x-coord_1 y-coord_1 ..... x-coord_n y-coord_n
Thus there is an entry for the x- and y-coordinates of each of the 'n' detected objects, corresponding to each of the 'n' objects in the photometry results file.
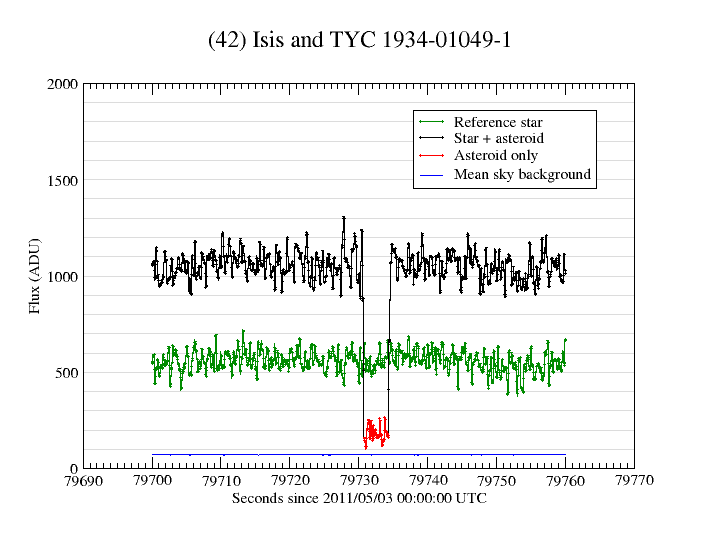
It's very easy to create graphs of the tabular data. Below is a graph obtained from video photometry with GoQat for the occultation of TYC 1934-01049-1 by the asteroid (42) Isis on 3 May 2011. The occultation took place between 22:08:50.58 +0.00/-0.10 and 22:08:54.28 +/-0.10 with a nominal duration of 3.70s.
